Canon LEGRIA FS46 User Manual
Browse online or download User Manual for Unknown Canon LEGRIA FS46. Canon LEGRIA FS46 User guide
- Page / 68
- Table of contents
- TROUBLESHOOTING
- BOOKMARKS
- Photo Application 1
- Contents 2
- Read This First 4
- System Requirements 5
- What is Photo Application? 6
- CameraWindow 7
- Main Window 11
- 2 Folders Area 12
- 3 Browser Area 12
- 4 Image display control panel 12
- 5 View Mode 13
- 6 Command buttons 14
- [Image Viewer] Window 15
- [Red Eye Correction] Window 16
- [Auto Adjustment] Window 17
- [Sharpness] Window 18
- [Trim Image] Window 18
- ROM drive 19
- Installing Photo Application 21
- Downloading Still Images 27
- Starting CameraWindow 28
- Downloading Selected Images 30
- Using a Card Reader/Writer 33
- Auto-Downloading 34
- Click [Download Images] 34
- Auto-Downloading Settings 34
- Click [Preferences] 34
- blue frame 36
- Printing Still Images 37
- Organizing Images 41
- Classifying the Images 42
- [Finish] 43
- Renaming Multiple Files 44
- Searching for Images 46
- Click [Finish] 47
- Folders Area 48
- Exporting Images 49
- Saving on CD-R/RW Discs 53
- Click [Backup to CD] 54
- [Specify Backup Settings] 54
- Using Various Functions 58
- Running a Slide Show 60
- Adding Sound to a Still Image 61
- Camcorder 62
- Uninstalling ZoomBrowser EX 63
- Troubleshooting 65
Summary of Contents
EnglishPhoto Application Version 35Instruction Manual
10Windows [Organize Images on Camera] WindowReturn to the CameraWindow menu screen. Display the Help menu.Configure Preferences settings (camcorder o
11WindowsWindowsMain WindowZoomBrowser EX is a software program used for organizing, printing and editing the downloaded still images. If you wish to
12Windows2 Folders AreaYou can select a folder to be displayed in the Browser Area. In the [Last Acquired Images] panel, the newly downloaded still im
13WindowsWindows5 View ModeYou can select the view mode of images in the Browser Area.[Zoom Mode]: The images in the selected folder are shown as thum
14Windows6 Command buttons1 View Image Displays a selected image in the [Image Viewer] window.2Properties Displays properties of the selected still im
15WindowsWindows[Image Viewer] WindowThe [Image Viewer] window appears when you select an image and click [View Image] or double-click an image.1 Prev
16Windows [Red Eye Correction] WindowSelect [Red Eye Correction] from the [Edit] menu, or click the icon and select [Red Eye Correction]. Use this
17WindowsWindows [Auto Adjustment] Window Select [Auto Adjustment] from the [Edit] menu, or click the icon and select [Auto Adjustment]. Use this t
18Windows [Sharpness] Window Select [Sharpness] from the [Edit] menu, or click the icon and select [Sharpness]. Use this to emphasize and clarify t
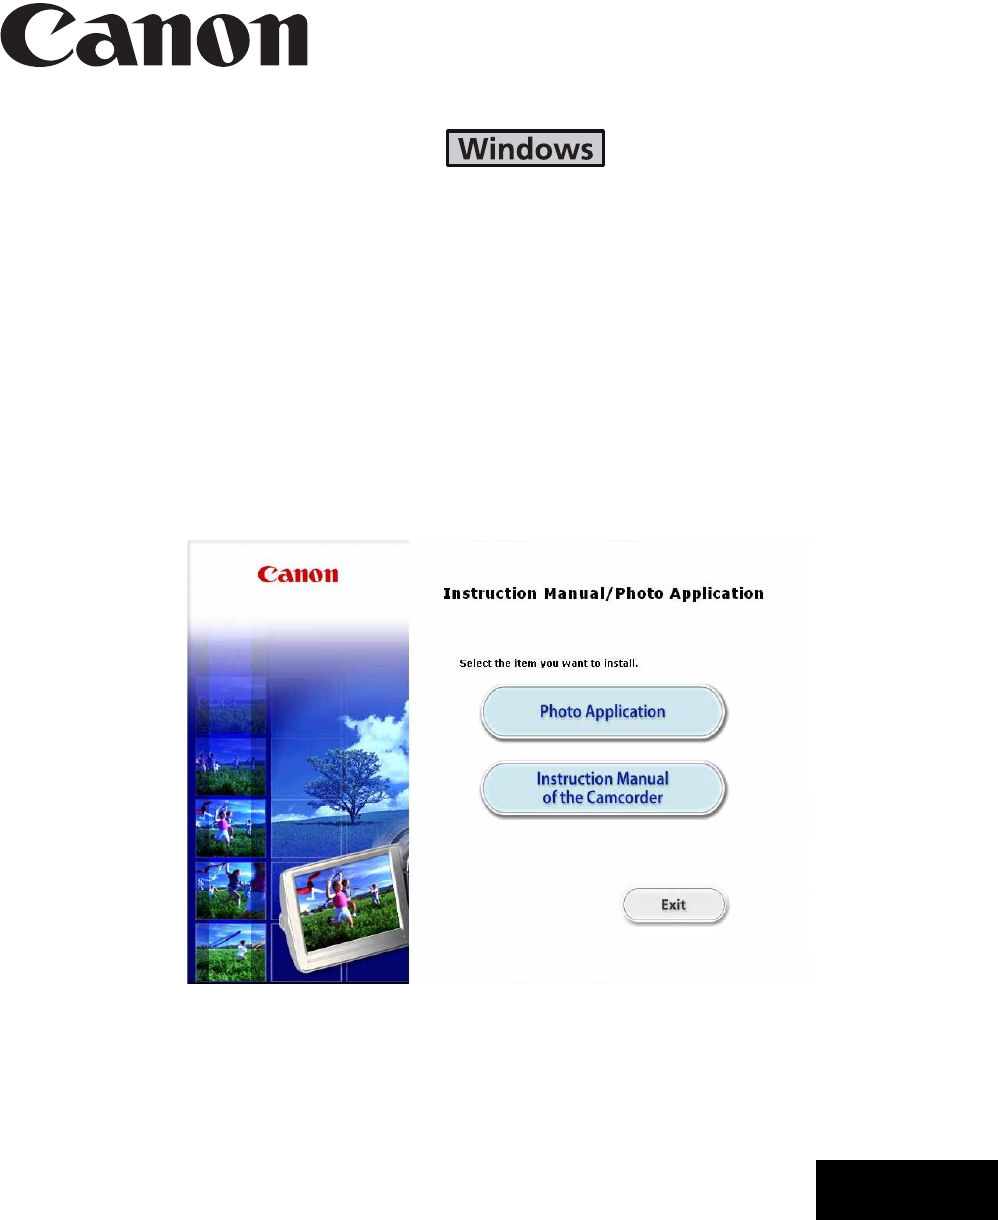
20Installing Photo Application and the camcorder’s Instruction ManualInstalling Photo Application and the camcorder’s Instruction Manual Be sure to i
2ContentsContentsRead This First ... 4Checking
21Installing Photo Application and the camcorder’s Instruction ManualWindows• Windows XP: The folder panel appears automatically.Double-click the [Di
22Installing Photo Application and the camcorder’s Instruction ManualInstalling Photo Application1Select Photo Application.2Select your area.3Select y
23Installing Photo Application and the camcorder’s Instruction ManualWindows6If other software is running, close all programs and click [OK].7Review t
24Installing Photo Application and the camcorder’s Instruction Manual9Click [Next].10When the installation is complete, make sure [Restart computer im
25Installing Photo Application and the camcorder’s Instruction ManualWindowsInstalling the camcorder’s Instruction Manual1Repeat the procedure ( 20) t
26Before Downloading Still ImagesBefore Downloading Still ImagesConnecting the Camcorder to a Computer Be sure to install Photo Application before yo
27Before Downloading Still ImagesWindows4Attach the supplied USB cable to the computer’s USB port and the camcorder’s USB Terminal.• Restart the compu
28Downloading Still ImagesDownloading Still Images Observe the following precautions when the camcorder’s access indicator is flashing. Failure to do
29Downloading Still ImagesWindowsStarting CameraWindow1Connect the camcorder to the computer ( 26).2Select [Canon CameraWindow] and click [OK].• Windo
30Downloading Still ImagesDownloading Still Images to the ComputerYou can select a downloading method in the [Import Images from Camera] window. Down
3ContentsWindowsUsing Various Functions ... 59Attaching Still Im
31Downloading Still ImagesWindows Downloading Selected ImagesDownload only the images that you select.1Click [Import Images from Camera] in the Camer
32Downloading Still Images3Select images for download in the [Import Images from Camera] window, and click the [Import] button.When the download compl
33Downloading Still ImagesWindowsDownloading All the Images on the CamcorderDownload all the images saved on the camcorder.1Click [Import Images from
34Downloading Still ImagesUsing a Card Reader/WriterSelect a download method in the image download window.The basic operations are the same as when yo
35Downloading Still ImagesWindows Auto-Downloading1Click [Download Images].• For instructions on how to set the Auto-download settings, see Auto-Down
36Downloading Still Images2Configure the settings and click [OK].The window below will be displayed when you select [Perform selected processes consec
37Downloading Still ImagesWindowsDownloading the Selected Still Images from ZoomBrowser EX1Click [Lets you select and download images].ZoomBrowser EX
38Printing Still ImagesPrinting Still ImagesYou can select one of the following 2 methods to print still images.• [Photo Print]- Prints one still imag
39Printing Still ImagesWindows3Specify the print settings and click [Print].Click this button to switch between still images if multiple images are s
40Printing Still Images [Index Print]1Click [Print & Email] in the main window and click [Index Print].2Select the still images you wish to print
4Read This FirstRead This First Disclaimer• While every effort has been made to ensure that the information contained in this guide is accurate and c
41Printing Still ImagesWindows3Specify the print settings and click [Print].Click these buttons to switch between pages.Selects the printer.Rotates st
42Organizing ImagesOrganizing ImagesApplying Ratings and KeywordsThe rating can be used as one of the search conditions, or for the selection of image
43Organizing ImagesWindowsClassifying the ImagesThis task allows you to classify selected images according to the shooting date.1Click [View & Cla
44Organizing Images4Specify the folder structure and the saving folder and click [Finish].The selected images are classified into the specified folder
45Organizing ImagesWindowsRenaming Multiple FilesThis task allows you to rename multiple files at the same time, or to rename and copy multiple files.
46Organizing Images4Specify the settings and click [Finish].To rename a folder, select a folder, and open the [Rename Folder] window by selecting [Ren
47Organizing ImagesWindowsSearching for ImagesThis task allows you to search for images by rating, modification date, shooting date, comment or keywor
48Organizing Images3Specify the search conditions and click [Start Search].• The search results are displayed as thumbnails.• Select at least one sear
49Organizing ImagesWindows• The images of the search result are displayed in the [Search Results] folder. You can print or copy these images to anothe
50Exporting ImagesExporting ImagesYou can change the data type for selected still images and movies and save them as new files. You can also export se
5System RequirementsWindowsSystem RequirementsInstall the software on a computer meeting the following minimum requirements.* When using Windows XP, y
51Exporting ImagesWindows3Select images and click [Specify Export Settings].4Specify the export settings and click [Finish].The window varies dependin
52Exporting ImagesWhen you have selected [Export Shooting Properties]:You can select the information you wish to export and save as a text file.When y
53Exporting ImagesWindowsWhen you have selected [Export as a Wallpaper]:You can export and save the image as Windows wallpaper. This task cannot be pe
54Exporting ImagesSaving on CD-R/RW DiscsYou can copy and save images to CD-R or CD-RW discs. The shooting information is copied along with the images
55Exporting ImagesWindows4Click [Backup to CD].5Select the folders or images you wish to save and click [Specify Backup Settings].
56Exporting Images6Set the backup settings and click [Start Backup].The disc will be ejected from the drive when copying is complete.You can add image
57Exporting ImagesWindowsUploading Still Images to the CamcorderYou can copy still images saved on the computer to the camcorder. This function is not
58Exporting ImagesDeleting Still Images on the Camcorder Organizing Images on the Camcorder1Click [Organize Images on Camera][Organize Images] in th
59Using Various FunctionsWindowsUsing Various FunctionsAttaching Still Images to E-mail MessagesYou can attach selected still images to an e-mail mess
60Using Various Functions4Select image size and quality, and click [Finish].• If you selected [Using the recommended settings.], your e-mail software
6What is Photo Application?What is Photo Application?Photo Application allows you to download still images you recorded with the camcorder to a comput
61Using Various FunctionsWindowsRunning a Slide ShowYou can view selected still images in a slide show.1Click [View & Classify] in the main window
63Using Various FunctionsWindowsAdding Sound to a Still Image• You can add a sound to an image. The sound file that can be added to the image must be
64Using Various FunctionsReviewing and Changing the Owner Name of the CamcorderYou can change and confirm the owner’s name of the camcorder.1Connect t
65Uninstalling the Software and the camcorder’s Instruction ManualWindowsUninstalling the Software and the camcorder’s Instruction ManualUninstall the
66Uninstalling the Software and the camcorder’s Instruction ManualUninstalling the camcorder’s Instruction Manual1Delete the icon of the camcorder’s I
67TroubleshootingWindowsTroubleshootingConnectionCamcorder is not recognized when connected to the computer. There is no memory card in the camcorder
CANON INC.Canon Europa N.V.Bovenkerkerweg 59-61, 1185 XB Amstelveen, The NetherlandsCanon UK Ltd.HelpdeskTel No.: 08705 143 723 (Calls may be recorded
7WindowsWindowsWindowsCameraWindowAfter you connect the camcorder to your computer, you can use CameraWindow to download still images to the computer.
8Windows [Organize Images on Camera] WindowDelete still images saved on the camcorder, without having to download them to the computer, and upload* s
9WindowsWindows [Import Images from Camera] WindowReturn to the CameraWindow menu screen. Display the Help menu.Toggle the shooting date/time and fil
More documents for Unknown Canon LEGRIA FS46


Related products and manuals for Unknown Canon LEGRIA FS46

 (764 pages)
(164 pages)
(764 pages)
(164 pages)
 (132 pages)
(161 pages)
(132 pages)
(161 pages)
 (187 pages)
(647 pages)
(187 pages)
(647 pages)
 (26 pages)
(114 pages)
(26 pages)
(114 pages)
 (146 pages)
 (134 pages)
 (112 pages)
(85 pages)
(196 pages)
(112 pages)
(85 pages)
(196 pages)
 (22 pages)
(686 pages)
(116 pages)
(144 pages)
(22 pages)
(686 pages)
(116 pages)
(144 pages)
© 2020, manymanuals.com. All rights reserved. | 1.330 s |
 Manymanuals.com
 Manymanuals.de
 Manymanuals.fr
 Manymanuals.it
 Manymanuals.pl
 Manymanuals.cz
 Manymanuals.es
 Manymanuals-pt.com
Comments to this Manuals